Setting up Twitch is simple, but the amount of configuration options could be overwhelming. In this blog, we’ll walk you through the entire process — from setting up to creating the most engaging game stream content.
The influx of viewers and streamers on Twitch has been on the rise for eight years. The coronavirus pandemic also contributed to the increasing number. From January to September 2020, Twitch saw a 37% growth in its average users (from 1,357,375 to 2,162,870)
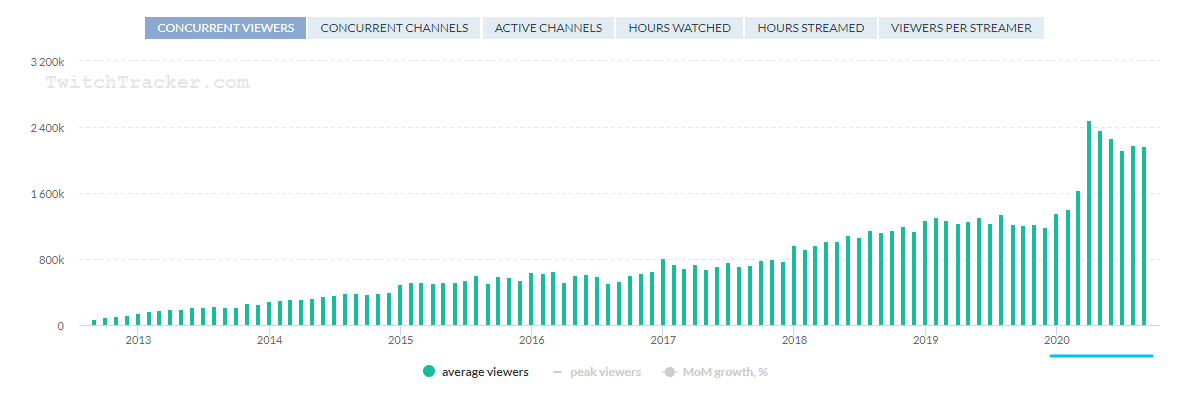
(Source: TwitchTracker, as of September 16, 2020)
For content creators, especially game streamers, this is a promising opportunity. If you’re already a professional game-streaming enthusiast, or looking into making a hobby or career out of game streaming, you may want to look into Twitch.
Table of Contents
-
-
- Before you begin
- What you need to stream on Twitch with OBS
- Create a Twitch account
- Get stream key from Twitch
- Connect Twitch to OBS
- Alternatives to OBS
- How to stream on Twitch with OBS
- How to stream to Twitch from Xbox and PlayStation
- Tips for streaming success on Twitch
- Take it to the next level with multistreaming
-
Before You Begin
Twitch has a friendly interface for newcomers to stream their content. But a lot of streams get shut down due to violations of Twitch’s community guidelines. So make sure you carefully review their policies, terms of services, and moderation and safety rules before setting up your streams.
What You Need to Stream on Twitch With OBS
- A stable internet connection
- Streaming software:
- Open Broadcaster Software (OBS)
- Twitch (web app or Twitch Studio beta)
- Hardware: a PC, Mac, or game console
- Audio source: microphone
- Video source: your webcam or camera
Create a Twitch Account
Twitch released a new user-interface update in 2019. But the signup should take less than a minute
- Go to twitch.tv > click Sign Up
- Fill out the sign up form
- Twitch will ask you for two-factor authentication. Check the email you use to sign up for a 6-digit code, then paste it back to the pop-up in Twitch.
You’re all set to get started!
Get Stream Key From Twitch
OBS allows you to connect to Twitch via your account or a stream key. If you want to connect from an account, skip this step.
A stream key is a unique code that you use to connect Twitch to OBS, or any other livestreaming platforms. Your stream key should be kept secret. Do NOT share this key with anyone as they can broadcast on your stream.
To get a stream key from Twitch:
- In twitch.tv, click on your profile picture > Creator Dashboard
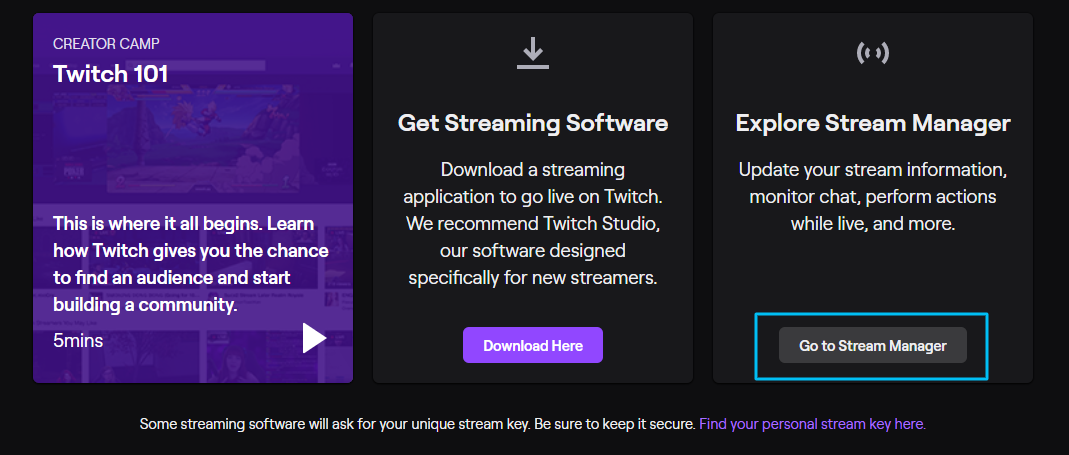
- Click Go to Stream Manager
- On the left sidebar, go to Preferences > Channel
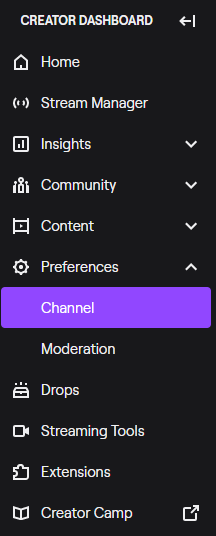
- You’ll find your stream key under Primary Stream Key

Connect Twitch to OBS
Open Broadcaster Software (OBS) is a free and open-source software program. OBS is often used as a software encoder, but many streamers customize it for advanced usage.
First off, you can install OBS here. OBS is available across Windows, macOS and Linux.
After installing, open OBS:
- Go to File > Settings
- Select Stream on the left sidebar
- In the Service section, select Twitch from the dropdown menu
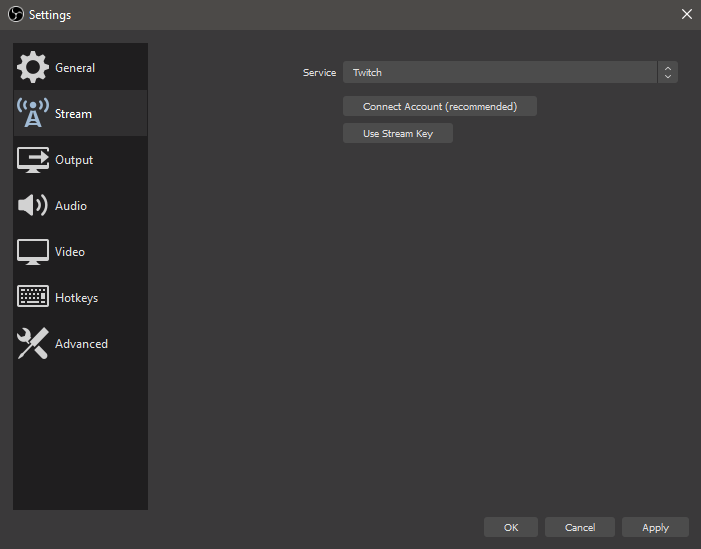
If you connect via Twitch account, click Connect Account > sign in to Twitch > input your 6-digit two-factor authentication number.
If you use your stream key, paste the stream key found in Twitch to your OBS.
Click OK, and now you’re connected.
Alternatives to OBS
If OBS is not your encoder of choice, there are several software encoder programs that serve the same functions. Here are some of our suggestions:
- Streamlabs OBS (SLOBS)
- XSplit
- vMix
- Wirecast
- Gameshow
- Nvidia Shadowplay
- Lightstream
Learn more about the differences of software encoders
How to Stream on Twitch with OBS
Setting up a basic streaming session on Twitch should take less than 5 minutes — but OBS’ interface and configuration numbers could get you lost. You may look at your computer’s capacity to define the right specs for your streams. Here’s a reference on choosing the right resolutions, bitrates and framerates.
You can also learn more at Twitch’s Broadcasting Guidelines.
It usually takes several trials and errors to get the smoothest streams possible. We recommend that you experiment with different setting combinations before going live.
Step 1: Bitrates, Video, and Audio Settings
Bitrates
Bitrate is the number of bits processed in one second. In general, the higher the bitrate is, the better the quality of your stream turns out. However, high bitrates can also put a massive strain on your hardware, causing unstable video streams.
Your chosen bitrates depend on your computer, encoder type, and internet upload speed. It also depends on your resolution and framerates. Bitrates are only expected to go up when the resolution and frame rates increase.
For example, Twitch recommends a bitrate of 6000 kbps when streaming at 1920×1080 and 50 fps, or 3000 kbps at 1280×70 and 30 fps.
Once you have determined your bitrate, go to OBS > File > Settings > Output > under Streaming, enter your Video Bitrate and choose your Encoder (Software x264 or Hardware QSV)

Video Settings
On the left sidebar, go to Video > choose your Base (Canvas) Resolution, your Output (Scaled) Resolution, Downscale Filter, and Common FPS Values.
Twitch recommends a Full HD resolution setting is 1080p with 60 fps. The higher your frame rates are, the more encoding power you’ll need — so choose a frame rate according to your device’s capacity.
Audio Settings
Audio is another essential factor of the quality of your livestream.
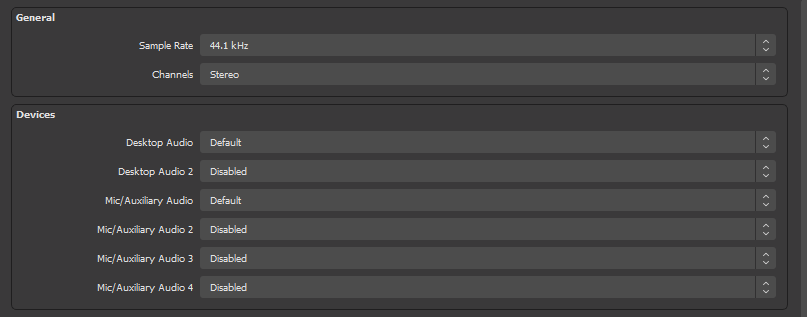
On the left sidebar, click Audio > choose a sample rate between 44.1 or 48 kHz.
Then pick your audio device. If you broadcast sound from your computer, choose your Desktop Audio. If you have a microphone, select your device from the Mic/Auxiliary Audio section.
Step 2: Assemble
For game streamers, a typical stream on any platform requires three main components: Your game, your audio, and your webcam.
Set up your game:
- Have your game running
- In OBS > Sources > click the (+) icon > select Game Capture
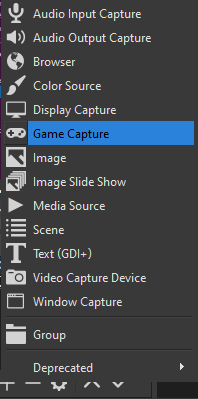
- Name your new Game Capture > choose Capture specific window > Select the game you’re playing. Make sure you adjust your game to full screen.
- A preview of your game will appear in OBS windon
Note: If the Game Capture mode does not work, try Sources > (+) icon > Display Capture
Set up your webcam:
- In OBS > Sources > click the (+) icon > Video Capture Device
- Fill in the details > OK
Step 3: Test
At this point, you are almost ready to start streaming your game. But to be extra careful before going live in front of your audience, we recommend that you do a test run for audio and video.
In the Audio Mixer section, you can adjust the volume of your game sound and sound from your microphone.
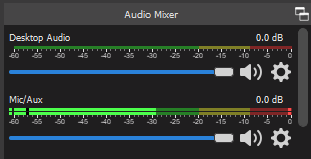
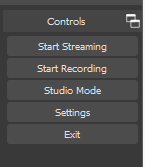
To test, click the Start Recording button on the right. Briefly play your game and speak to your microphone > click Stop Recording and watch through your test. If the volume is too high or too low, you can always adjust using the Audio Mixer.
Another trick you can do for stream testing is to broadcast to a dummy Twitch account, in which you make sure nobody has access to it.
Step 4: Go live
One final step and you’re done:
- Go back to your Twitch Dashboard > Stream Manager
- Click Edit Stream Info on the right
- Give your stream a Title, Go Live Notification. Choose a Category, Tags, Stream Language > Done
How to Stream to Twitch from Xbox and PlayStation
You don’t need a whole gargantuan gaming PC to be able to stream games on Twitch. In case of a limited budget, you can still stream from your own game console. Here’s how you can stream games to Twitch from Xbox One and PlayStation 4.
To stream from Xbox One:
- Go to your profile > Apps > select Twitch
Note, if you don’t have Twitch installed yet, go to the App Store to download - A Twitch window will open. Make sure you’re already signed in.
- From the top, click Broadcast
- A pop-up screen will appear. Give your Twitch stream a name.
- If you have a camera setup, you can connect in the Camera Position section.
- Under Broadcast Bar Position, choose where your broadcast will show up on your screen.
- Adjust the volume of your Microphone, Party Chat (to hear other players) and Game.
- Choose your bitrate and stream resolution. Twitch has the option to automatically determine your bitrate. For stream resolution, the best option is 1080p; but if you have average internet speed, 720p still works.
- Click Start Streaming
To stream from PlayStation 4 (PS4):
- In PlayStation, start the game you’d like to broadcast
- Press the Share button on your controller
- Back on your screen, in the Share menu, click Broadcast Gameplay
- Choose Twitch as the service you want to broadcast on
- Your PS4 will connect to Twitch
Note: Make sure you’ve already signed in. If you haven’t, this is the next step. There are two ways to sign in to Twitch from PlayStation:- Via a QR code: Go to https://www.twitch.tv on your mobile device or computer, or scan the QR code provided on the screen. Then follow the instructions.
- Via a code: You will see a unique code on your screen. Enter the code on your mobile device or computer and you will be directed to the next step.
- Once your PS4 is connected to Twitch > click OK. You will see the Settings screen.
- Configure your settings: webcam video, microphone audio, message display
- Give your stream a title
- Choose the resolution and framerate for your stream > click Start Broadcasting
- To stop streaming, pause your game > go to Broadcast Settings > Stop Broadcasting
Tips for Streaming Success on Twitch
Build rapport with your viewers
A common issue that many Twitch streamers encounter is low audience reach. Twitch suggests that you should customize your channel so your viewers know who you are, what type of content you provide, and even a bit of your personality!
Stream consistently
Consistency is another key to streaming success. When you stream on a regular basis and on a fixed schedule (i.e., a certain day of the week), your audience will know in advance when to show up.
Set up notifications
One more tip: notify your audience before streaming. Twitch has a notification feature, which automatically sends messages to your frequent visitors whenever you go live. Make sure you customize and optimize your notifications, so your viewers will want to tune in right away!
Take it to the Next Level with Multistreaming
If you are a pro-gamer or pro-streamer and want to reach a larger audience, multistreaming is your key.
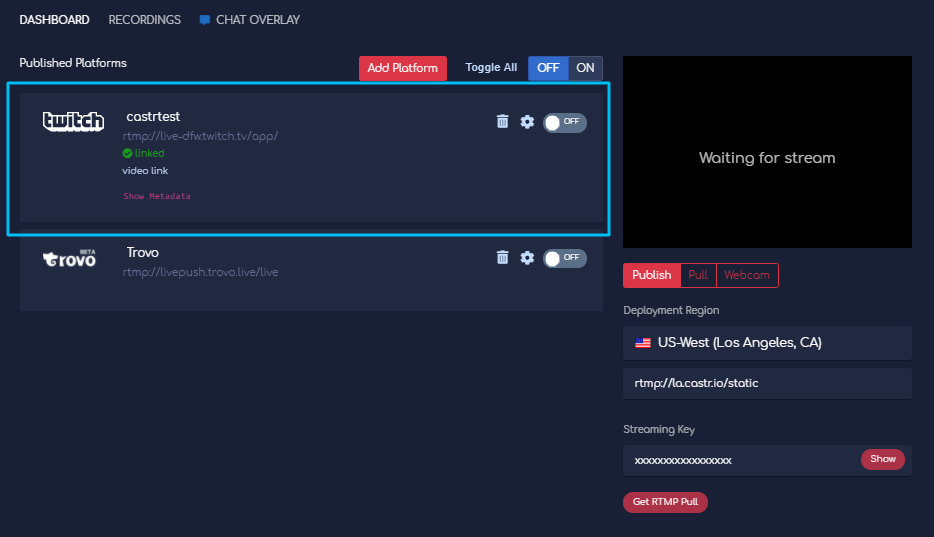
Castr can help you multistream from OBS to Twitch and any other platforms such as Facebook Gaming, Facebook Live, YouTube Events, DLive, Mobcrush, and more. This can be done in three simple steps:
- Connect OBS to Castr via a stream key
- In Castr dashboard, add as many publish platforms as you like to stream to
- Connect Castr to your publish platforms (Twitch, Facebook, YouTube, etc.) and you’re set to multistream.
Takeaways
- Tools you need: a stable internet connection, OBS, Twitch (web app or Twitch Studio beta), microphone (optional), your webcam or camera (optional)
- Two ways to connect Twitch to OBS: auto-connect via a Twitch account or using a stream key
- To get a stream key from Twitch, go to Twitch Creator Dashboard > Go to Stream Manager > Preferences > Channel > Primary Stream Key
- Connect Twitch to OBS: go to OBS > File > Settings > Stream > Service > select Twitch.
- Set up your configuration: bitrates, resolution, audio sample rate. Add your audio source (from your computer or microphone).
- In your OBS main window, add your Game Capture, and Video Capture Device for webcam video source.
- Do a test run by clicking Start Recording before going live.
- Finally, go to Twitch Dashboard > Stream Manager > Edit Stream Info > fill in the information > click Done
- You can also stream from Xbox and PlayStation to Twitch
Join 200,000+ streamers worldwide
With Castr, you can easily livestream and multistream videos to 40+ platforms.
No Castr Branding
No need to remove Castr branding on your videos
No Commitment
No contracts. Cancel or change your plans anytime
Cancel anytime
Highly skilled in-house engineers ready to help


